Image Slider By helperblogger.com The slide is a linking image Pure Javascript. No jQuery. No flash. #htmlcaption
Featured Post Today
print this page
Latest Post

How to set or add wallpaper or photo as a folder background in windows without using any 3rd party software

Using Desktop.ini .Hack to Set Wallpaper as Folder Background Image.

1. Open Command Prompt and set folder attribute to "system".
 Suppose there is a folder "Setup" in "D:\" drive, in which you want to set wallpaper as background image. So give following command in Command Prompt:
attrib +s D:\Setup
It'll change the attribute to "system".

2. Now open Notepad and paste following code:

[ExtShellFolderViews]
{BE098140-A513-11D0-A3A4-00C04FD706EC} = {BE098140-A513-11D0-A3A4-00C04FD706EC}
[{BE098140-A513-11D0-A3A4-00C04FD706EC}]
Attributes=1
IconArea_Image=path_of_the_wallpaper
IconArea_Text=0x00000000

Now change "path_of_the_wallpaper" to the exact path of the wallpaper which you want to set as background. Suppose the wallpaper is stored in "D:\Wallpaper\Image1.jpg", then the code will be as following:

[ExtShellFolderViews]
{BE098140-A513-11D0-A3A4-00C04FD706EC} = {BE098140-A513-11D0-A3A4-00C04FD706EC}
[{BE098140-A513-11D0-A3A4-00C04FD706EC}]
Attributes=1
IconArea_Image=D:\Wallpaper\Image1.jpg
IconArea_Text=0x00000000

NOTE: If you copy the wallpaper in the same folder which you are editing, then you can simply put the wallpaper name in the file. E.g. if you copy the "Image1.jpg" file in "Setup" folder, then the code will be as following:

[ExtShellFolderViews]
{BE098140-A513-11D0-A3A4-00C04FD706EC} = {BE098140-A513-11D0-A3A4-00C04FD706EC}
[{BE098140-A513-11D0-A3A4-00C04FD706EC}]
Attributes=1
IconArea_Image=Image1.jpg
IconArea_Text=0x00000000

"IconArea_Text" stands for the text color, you can change it to white, yellow, blue, black or any other color. You just need to know the hexa-decimal number of the color and then replace the code in "IconArea_Text" section. A few most used color codes are as follows:

Black - 0x00000000
White - 0x00FFFFFF
Green - 0x0000FF00
Blue - 0x00FF0000
Purple - 0x00C000C0
Red - 0x000000FF
Yellow - 0x0000FFFF
Indigo - 0x00FFFF00

3. Now save the file with name "Desktop.ini" (excluding quotes) and copy the file in the desired folder which is "Setup" in our example.

4. That’s it. Close the folder and re-open it. Now it should show the wallpaper as background.

0 comments

How to add a local user to take ownership of a file in windows XP,Vista & seven

1. Go to the folder containing the file whose ownership you want to take.
2. Select the file.
3. Right click of the mouse and choose "properties".
4. The property window will be opened.
5. Then goto "Security" tab.
6. In the "Group or User Names" Choose the user that you are logged in and you want to add the ownership of the file.
7. Click on "Edit".
8. A new window for permission will be opened.
9. In the permission window choose the user and  in the "Permission For User"  tab  tick on "Full Control"
                                                                  [See Screenshot]


10. Then again go to the Properties window of the selected file.
11. Then click on "Advanced"
12. A new window for advanced Security Setting will be opened.
13. In the permission tab Chosose the user and click on "edit".
14. Again a new window will be opened.Here also choose the user and click on edit.
15. A New window for permission entry will be opened.
16. Then in the opened window. In the permissions ; Scroll-down the Hoizontal scroll bar.
17. Tick on Full control, .
18. Click on "ok". Now save all the opened window.
Now you have add the ownership of the file to your logged in user.
                                                            

                                                                   [See Screenshot]


0 comments

How to Edit (Add/remove) option on send to menu in windows Xp, Vista and Seven

In other words we can add our favorite folder or program as a shortcut on SEND TO menu. Generally for a selected file or files in send to menu desktop or any removable device or bluetooth device is there. But by this process we can add any drive or any folder placed any where on our system also any program as a shortcut on the send to menu. This will very helpful in data transfer.
This will explain how you can add or delete items from the “Send to” menu list in Windows 7, Windows Vista and Windows XP.
Process:
1. Navigate to the following folder in windows
      For XP Users-
C:\Documents and Settings\(User-name)\SendTo
  For vista and seven users-
C:\Users\(User-name)\AppData\Roaming\Microsoft\Windows\SendTo

Here user-name refers to the user name of your system where you currently logged in. Type the user name on that place without the braces.

2. There you will find all the shortcuts that are included in the shortcut menu of your windows.Add or delete whatever you like on that folder.Any modification on that folder will change the items on send to menu.

3. To delete any item from the send to menu. Just select that and right click of mouse on it and select delete and hit enter.
4. To add any application or a folder as a shortcut you follow this-
 Right click of mouse on an empty space of the open folder -> Select new -> Select Shortcut -> Now choose the application or a folder as shortcut. Click ok.
Now you will find an extra option on the send to menu.

5. I have created a shortcut for d drive on the send to menu.

If you find some error during the modification of the send to folder.  Then it is required to take ownership of the send-to folder to logged user. 
0 comments

How to use all your fingers in right place in keyboard to become a fast typist

Tips:

1.  Use all of your fingers.
2.  You need to know where to place your finger.
3.  Never see the keyboard while typing. Just remember what finger will type it.
4.  More practices.

Here are the keys that should be press by your finger
Left Hand:
Index finger = 4 R F V 5 T G B
Middle finger = 3 E D C
Ring finger = 2 W S X
Little finger = 1 Q A Z ` Tab “Caps Lock” “Left Shift” “Left Ctrl”

Right Hand:
Index finger = 6 Y H N 7 U J M
Middle finger = 8 I K ,
Ring finger = 9 O L .
Little finger = – [ ] µ / \ = Backspace Enter “Right Shift” “Right Ctrl”

Before start typing, place your fingers in the right place. Notice button F and J in your keyboard. There is a kern below the letter. That is the place where your index finger should be. Put your left index finger in F, and your right index finger in J. The rest of your fingers
should be:
Left middle finger = D and the right middle finger = K
Left ring finger = S and the right ring finger = L
Left little finger = A and the right little finger = ;

Ctrl – Alt – Shift
To combine keys ctrl, alt or shift with another key, you should notice where is the key, in the left hand side, or right hand side. For example, to combine Ctrl + L, you should know where is the position of the L key. From the picture above, we know that L is in the right side. So you must press left Ctrl using your left little finger and press L using right ring finger.

First practie by watching the keyboard keys. Then try to remember all the keys where they are palaced. Then practice without watching the keyboard.First you will feel that your typing speed is very slow then practice will increase your typing speed.

0 comments

How to create hidden & unsearchable folder in windows XP,Vista & seven

If we change the properties of the folder to hidden (right click on the folder- >properties- >tick hidden)
Then properties of the folder become hidden. But if show hidden files & folder is enable (folder option- > view- >hidden files & folder - > tick show hidden files & folder) then it shows that folder.
But anyone search that folder can find the content of that folder. So this process is not useable.
Also See: How to create an Invisible folder in Windows
PROCESS -1:-
         “recycler” – it is a folder which is hidden and unsearchable.Its location is just inside the drive except c: (windows installation drive)
         Only type “d:\recycler” (excluding quotes) in the address bar it opens a folder with name “recycler” in d drive. You  Can also change the drive letter. Put your data there & come out. It don’t show anything in d Drive and no one can search the contents.
        To reach that folder “recycler” only way is type the address in the address bar i.e. d:\recycler or any
        other drive letter in place of d. if you have created the recycler folder in any other drive.

The process is good in Windows XP operating system but it is not working properly in Windows Vista and seven.

PROCESS -2:-
                     This process is more reliable than process 1.
Create a folder with any name anywhere inside your system.
Then change the attribute of the folder to hidden and unsearchable by command prompt.
 Suppose there is a folder named “xxx” inside the folder “rock” in d: drive. We have to make hidden and
Unsearchable to that folder using command “attrib +s +h” in command prompt.

Step1:-
               Open command prompt (window logo key + R- > type “cmd”- > hit enter)
          E.g. It will display the command prompt screen-
                       C :\>
Step2:-
             Type attrib +s +h [folder path] ->hit enter
            e.g. c :\> attrib +s +h d:\rock\xxx

This will make the folder “xxx” hidden and unsearchable
NOTE:-
   1. We can reach the content of that folder by typing the full path of the folder (i.e. d:\rock\xxx) in the Address bar.
   2. For change its attribute to unhidden and searchable use the command attrib “–s –h” in step2.
 e.g.
         C :\> attrib -s -h d:\rock\xxx

NOTE:-
1. +s makes the attribute of the file & folder to system
2. +h makes the attribute of the file & folder to hidden.
3. –s removes the attribute of the file & folder from system to general.
4. –h makes the attribute of the file & folder to un hidden

0 comments

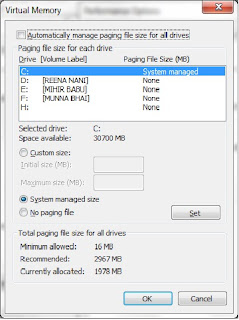
How to use internal hard disk memory as External Virtual RAM in windows 7 & XP

The process will use our Internal Hard disk memory as virtual memory to use it as External RAM. We can able to choose a different memory for our each windows drive to use it as Ram.

1. Open System Properties Window
 2. Navigate to "Advanced" tab.
Note: For Window Seven users first click on "Advanced System setting" on the left side of system property screen and then go to "Advanced" tab.
3. On the "Performance" Section Choose "Setting".
4. On the open "Performance Option" window Navigate to "Advanced" tab.
5. On the "Virtual Memory" Section click on "change".
6. It will open Virtual Memory Window.
7. Uncheck the option "Automatically manage paging file size for all drives" for manually allocate memory to use it as RAM from each Windows Drive.If you check the option then Windows will automatically use memory from each drive to use it as RAM.
8. On the drive name Select the drive where you want to allocate memory.
9. Below that you will find an option "Custom Size". Click on that and allocate the memory from that drive to use it as RAM. Otherwise select the option "System Managed size" then Windows Will automatically allocate some memory from that drive to use it as External or Virtual RAM.
10. Now Click on "Set".
11. Similarly you can also repeat the process for other drives also.
12. If you want to remove this then Choose "No paging file" on step9.
13. Now click on Ok. and save all the open Window by clicking on "OK".

Note: This will create a "pagefile.sys" system hidden file whose size is same as the virtual Ram.


0 comments

Very important windows run commands

windows run command অতি প্রয়োজনীয় উইন্ডোজের রান কমান্ডের সবচেয়ে বেশী (১৭৭+) কীবোর্ড শর্টকাট কমান্ড একত্রে!
A:
Accessibility Controls – access.cpl
Accessibility Wizard – accwiz
Add Hardware Wizard- hdwwiz.cpl
Add/Remove Programs – appwiz.cpl
Administrative Tools – control admintools
Adobe Acrobat (যদি ইনষ্টল হয়ে থাকে)- acrobat
Adobe Designer(যদি ইনষ্টল হয়ে থাকে)- acrodist
Adobe Distiller (যদি ইনষ্টল হয়ে থাকে)- acrodist
Adobe ImageReady (যদি ইনষ্টল হয়ে থাকে)- imageready
Adobe Photoshop (যদি ইনষ্টল হয়ে থাকে) – photoshop
Automatic Updates – wuaucpl.cpl
0 comments

LinkWithin

Related Posts Plugin for WordPress, Blogger...
 
Helped By : WWW.KASPERWINDOW.TK | KasperWindowTemplate | Download This Template
Copyright © 2011. TOWARDS HEAVEN - All Rights Reserved
Template Created by Aehtasham Aumee Published by KasperWindow
Proudly powered by Blogger